I've been working with a few students on kicking recently, and I also taught a clinic on kicking a month or so ago. Because of all of this increased kicking activity, I've spent some time examining and honing my own favorite systems for 1, 2, and 3 rail kicks on different tables, listening to my students and testing out their theories, and in some cases incorporating some new ideas into my arsenal as well.
One type of kick that I've had the opportunity to demonstrate several times is kicking to a spot on the end rail from the opposite end rail. It came up in class as well as in a recent game in competition, where I was able to show a group of people after the match how to calculate the kick. It's based on a simple system / principle I learned playing three cushion, I've also seen it referenced a few other times but very rarely. Which is why I thought I'd add it to my list of instructional articles on the topic!
One type of kick that I've had the opportunity to demonstrate several times is kicking to a spot on the end rail from the opposite end rail. It came up in class as well as in a recent game in competition, where I was able to show a group of people after the match how to calculate the kick. It's based on a simple system / principle I learned playing three cushion, I've also seen it referenced a few other times but very rarely. Which is why I thought I'd add it to my list of instructional articles on the topic!
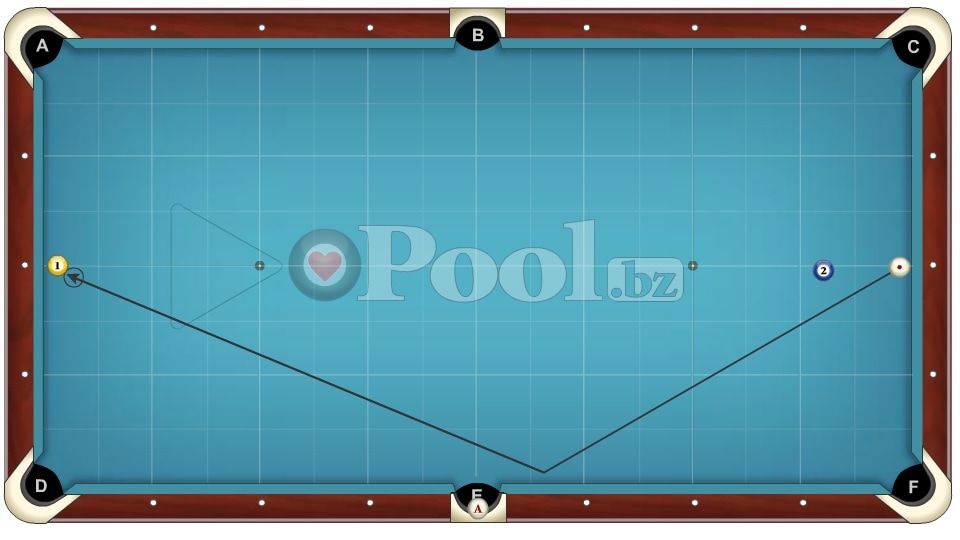
In the diagram above you can see the basic starting shot for the system. If the cue ball starts from the middle diamond on the end rail (positioned at the nose of the cushion, NOT through the diamond), then shooting through the 4th diamond on the long rail (effectively the back of the side pocket, marked by ball A above) with a normal rolling cue ball and slow speed (no english) should bring the cue ball to the same spot on the opposite cushion, in this case hitting the 1 ball perfectly.
You'll need to test out your particular table, but for most tables this works pretty well. You may need to increase your speed slightly or even use just a hair of running (in this case right) english. If you want to kick at the ball with a firmer speed, you can do that as well by using normal running english (1/2 to 1 tip above center, 1/2 to 1 tip of english). This gives you two reference speeds to use as needed, slow to medium or firm, just be sure to use the appropriate english to match the speed you are using.
So this is great, but what if the balls aren't positioned like this? Well, it turns out that the cue ball will return to the same spot it started from on the opposite end rail if shot through the back of the side pocket. This means if the cue ball were 1 diamond down from pocket C, it will return to 1 diamond down from pocket A, and so on. This is even more useful, but what if you need to kick at a ball in a different position on the other end rail? Read on...
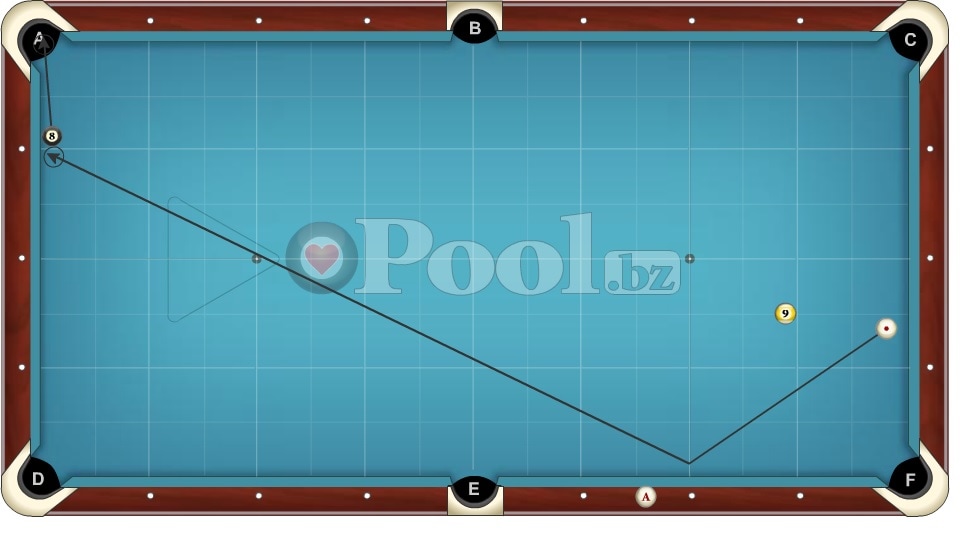
Here's the real power of the system. First, I determine the cue ball's starting position at the nose of the cushion. I draw a line from the cue ball through the back of the side pocket to determine its starting position on the end rail. In this case, the starting position is about 1 1/2 diamonds above the corner pocket F. That means if I hit the cue ball through the back of the side pocket, it will return to the opposite end rail about 1 1/2 diamonds above pocket D.
But since I want to hit the 8 ball, which is 1 1/2 diamonds farther up the rail, I adjust my aim point by that same amount, 1 1/2 diamonds closer as shown above by ball A on the rail. As mentioned above, I can aim at this spot and choose to use a slow to medium speed and no english or firm speed with running english, I should hit the 8 ball and quite possibly make it from this position, with also a good probability of getting shape on the final 9 ball.
This system works best when the cue ball is near the end rail, but the object ball can be anywhere as long as you can estimate the line off of the side rail. If the cue ball is more than just a few inches away from the end rail, and if you need to make an adjustment to hit a different spot on the opposite end rail, the calculations won't work correctly - try it and you'll see what I mean. In this case, you can still use the system but you have to combine it with the spot on the wall technique to adjust for the change in the cue ball origin. Perhaps I'll cover this in a future article. But these types of situations come up all the time from end rail to end rail, so by having this knowledge and with a little practice you can quickly add another weapon into your kicking arsenal.
In summary - test out your table, figure out what speed and english (if any) is needed to make the reference middle diamond to middle diamond shot by shooting at the back of the side pocket. Then when kicking at a ball, determine your starting position and subtract or add based on whether the object ball you are trying to hit is forward or behind the same position on the opposite end rail. Simple, no numbers to remember, no calculations to perform, and amazingly accurate.
Enjoy, and happy kicking!
