| Intro to 3 Cushion.pdf |
|
Have you ever watched a match and said to yourself, “He never has a hard shot”? While it might be boring to watch, that’s the key to playing pool at the highest level. Even the best players in the world miss difficult shots just like we do, so to be able to string shots together and run racks you must become an expert in shooting easy shots – that’s where position play comes in.
Position play is relatively simple in concept – you need to know where you want the cue ball to go, then how to make it go there. Of course you still need to have decent fundamentals in order to hit the cue ball correctly, experience to be able to aim properly, and enough practice and coordination to be able to execute the shot, but without a plan to get on the next shot the game simply becomes a pure shot making exercise, one that you will surely lose. I learned a lot about position play from reading books and watching a ton of recorded professional matches. You can learn a lot from the commentary, and with all of the free content available on YouTube and similar sites you have months or even years of matches available for your viewing pleasure. If you like to read and really study the technical aspects of the game, I highly recommend anything by Robert Byrne or Phil Capelle, they’ve each written many excellent books on various facets of pool. If you can only get one or two, get the Standard Book of Pool & Billiards by Byrne or Play Your Best Pool by Capelle, you won’t be disappointed. Position play is achieved through a combination of knowledge, angle, spin, and speed. You have to know what is possible and what is not, and where the correct position is – without this, you might play perfect position to an incorrect target. You need the correct angle in order to keep the route as simple as possible and avoid obstacles. You need the right spin in order to get the cue ball to travel on the desired angle and path, and finally the correct speed to land at the intended location. There are several principles that come into play when thinking about playing position. I’m going to list ten key concepts that I think are important, many of which I learned from reading the books mentioned above or hearing concepts discussed over and over during recorded pool matches. 1) Perfect Angle + Perfect Speed = Perfect Position This is the key, plain and simple. You need to have the correct angle on the shot, and then use the correct speed/spin on the cue ball to follow the intended path to the next shot in the sequence. Simple, right? 2) Think in Threesomes… J Position play is all about thinking in groups of threes – you want the correct angle on your current shot, which then takes you to the correct position on the next shot, allowing you to get position on the third ball in the sequence. Danny DiLiberto, legendary pro pool player and frequent match commentator, is famous for saying “You need an angle for an angle”. Players should of course look at the rest of the rack and scope out any problems, look for key sequences, etc., but essentially you are simply performing a rolling three ball analysis and execution throughout each game – 1/2/3, 2 /3/4, 3/4/5, etc., until you sink the game ball. With knowledge and practice this will become second nature. 3) Get in the Zone I’ve heard many players, even pros, talk about playing precise position for a specific spot. “That guy can stop his cue ball on a dime”. Well, I hate to burst your bubble, but no one can stop the cue ball that accurately shot after shot. While it may be advantageous to pick out a specific spot, and let your mind/eye computer use programmed muscle memory to feel the shot and send the cue ball there, the game is really about understanding and visualizing the position zones on each shot. These zones can vary in size from half a table to a few inches, can be wide or narrow, and are roughly triangular or rectangular in shape, narrowing as you approach the object ball. They are typically limited by obstructing balls, the rails, or maximum practical cut angles for the shot. Learn to identify and visualize these zones! 4) Enter at Your Own Risk Now that you are visualizing the zones, you should try whenever possible to enter the zone correctly. Imagine a rectangular-shaped zone that narrows as it gets closer to the object ball (this forms a trapezoid for you geometry geeks). You ideally want to send the cue ball down the line (right down the middle of the rectangle/trapezoid lengthwise) or across the widest part of the zone (the part usually farthest away from the object ball). Doing one of these things ensures that you are in the position zone for as long as possible, which maximizes your margin for error and allows you to stay in line from shot to shot. 5) It’s Good to be Right Right-sided, that is… On most shots there is a right (correct) and a wrong side. Being on the right (correct) side makes the shot natural and simple, the wrong side often requires more speed, more spin, or a creative or high-risk recovery shot to attain position. Think about when you are shooting a ball in the side pocket, and your next shot is in the middle of the end rail. Would you rather be on the right side, above the ball, and just float down toward the next shot, or be on the wrong side and have to force the ball around the table 2 or 3 cushions, using more speed and bringing into play other blocker balls and the scratch? This may be necessary sometimes, but staying on the correct side of the shot makes getting to the next position zone a breeze. 6) Long is Strong Most players do pretty well with this one naturally but it’s still worth mentioning. If a ball is 1 diamond away from the corner, it makes sense to position the cue ball on the long side, minimizing the distance the object has to travel into the pocket and maximizing your position zone. The zone is very small on the short side and most players intuitively know that. The key is planning ahead so you can utilize the zone on the long side, and also knowing when it makes sense to play for the short side in order to increase your overall odds of running out. 7) Keep it Natural Try to position the cue ball so that you can use natural shape to travel to the next ball in the sequence. It makes both the shot and position easier since you are minimizing or eliminating spin on the cue ball and only need to control your speed to attain good position. These shots are the bread and butter of great players and what makes the game look far easier than it is. 8) Stay Centered Getting back to the center of the table is a very important concept. When shooting from the center of the table, most shots are available and fairly close, and only those balls near the middle of the end rails or high up on the side rails are not accessible. As a bonus, if the cue ball passes directly through the center of the table after hitting a rail, it’s impossible to scratch! Practice the various 1, 2, and 3 rail routes leading to or through the center of the table and your game will improve immensely. 9) Play the Percentages In general, try to attain position following the simplest and/or highest percentage path. If you already have good position with a stop shot, don’t try to get a little bit closer or a slightly better angle at the risk of missing the shot or losing position. Sliding the cue ball a bit is usually preferable to using 1 rail, 1 rail is usually preferable to 2, 2 is better than 3, follow is usually easier to control than draw, etc. I say “usually” because there are always exceptions based on the layout of the table or your personal preferences. One thing I’ve learned from watching a lot of commented matches is that most good players use very similar position routes with just a few personalized deviations. They’ve all learned the hard way through experience what not to do or what isn’t the highest percentage shot. While following the above mentioned principles (and others) is very important, you also have to know when to break the rules. Shooting an easy shot and taking a slightly harder shot on the next ball is often better than trying a risky position play to get perfect on the next ball. Weigh your options at the table and let knowledge and experience guide you in making the best decisions you can. 10) Dare to be Different Staying focused on the proper way to play and the percentages is necessary if you want to win. But we all need to have a little fun sometimes too, right? Don’t be afraid to experiment during practice, shooting shots at different speeds, with unconventional spins, etc. Set up a shot by marking the table or using hole reinforcers, and shoot it using all combinations of spin to see what happens. Work on your stroke, trying to maximize your draw or follow action. Play with using side spin and how to compensate for the various effects (deflection, curve, etc.) at different distances and shot speeds. You will not only learn quite a bit about how spin can be used to alter cue ball’s path, but you will also learn your limits on certain types of shots, allowing you to better assess your chances in a game. And if you learn some cool or difficult shots or position routes, don’t be afraid to use them in a game when you need to, just use them sparingly and in appropriate situations.  Yep, it's that time again... Everyone goes through peaks, valleys, and plateaus, even pros, and sometimes you just need to go back and review all of your fundamentals to see if something might be getting in the way of you playing your best. I took a few lessons over the last couple months, only numbers 4 and 5 for me in my pool career, and while they weren't specifically on fundamentals, a few things were uncovered and made me want to really take a hard look at everything I was doing. The best way to do this is to capture some video of yourself shooting, so let me give you some advice on how to go about doing that and what to look for.
If you are self-analyzing, you will ideally want to use a high def, newer style video camera. If you don't have one of these, most current cell phones on the market also come with HD recording capabilities, so as long as you have a good light source and can prop the camera and phone up high enough and in the right position you should be fine with either option. You can also ask a friend to record the session, or as a last resort ask them to watch your stroke and tell them what to look for. I suggest capturing video from back, front, and side views. I'm certainly no expert in this, have not attended any certified schools to learn how to do video lessons etc., but a lot of it is common sense. You want multiple views to see different things from different angles. Make sure the parts you are recording are in the frame, and unless you are working on something specific, shoot normal shots into the pocket with the camera directly behind or in front of the shot. Try to shoot a variety of shots and speeds after the normal baseline to see if anything changes. When you are done recording the basics you can also shoot a few racks and watch later to look at your overall rhythm, patterns, etc. What should you look for when analyzing your stroke? From the back view, I'm looking to make sure the stick is roughly over your back foot, that it stays on line during the stroke, check the grip tightness and opening/closing of the hand, wrist angle to the stick, alignment of the upper arm and elbow over the stick, look for the arm or elbow moving up and down or sideways excessively, and generally looking to make sure the stance and stroke don't look cramped or crooked. From the front view, I will assess many of the same things as above but also see the follow through more clearly and make sure it stays on line with the shot, look for consistent stick/eye alignment and perhaps watch the eye patterns, check for head movement during the shot, and watch the overall stroke pattern and rhythm. From the side view, I make sure the forearm is roughly at 90 degrees to the stick, watch the grip movement during the stroke and the overall rhythm and pattern, watch for changes in or excessive tension (everything should just flow smoothly), and look for raising/lowering of the elbow or stick during the stroke. I'm sure there are more things than this, and I'll go into more details on certain aspects in future articles, but this is similar to the high level assessment I first do when seeing a student for the first time. I'm really just looking for glaring flaws or flaws that could be holding the back or causing inconsistencies (as I just found with my stroke - oops...). I also don't subscribe to any one way of doing things, so I try to stick to the preference vs. principle idea. There are many ways to accomplish something, but there are certain things that ideally must happen for the stroke to be pure and consistent. Anything beyond those few principles is a preference and you have leeway in how you approach and execute those concepts and personalize your stroke. Just because you do something different than me, or different than what is generally taught, doesn't make it bad. Even if you have a pretty distinct flaw, if you are able to execute shots consistently I wouldn't go out of my way to change it. Which brings me to the picture above. Jerry Briesath is a phenomenal instructor and one of the founding fathers of the current PBIA certified instructor program. He is actually who I had my first lesson with after I had been playing for almost 15 years and it still is one of the best 2 1/2 hours of instruction I've ever received. If you are looking to get back to fundamentals and get some great advice, I highly recommend his latest DVD series, it's a 3 DVD set and you won't be disappointed. Hope this helps those of you who are looking to analyze your strokes. If you would like me to analyze your personal video and offer some suggestions, just post the video online (YouTube, Vimeo, etc.) and email me a brief description and the link and I'd be happy to help. It’s funny how something so simple as placing your tip on the cue ball can be so misunderstood or misrepresented. I hear people say things like “Use 1 tip of english”, or “Just a little, maybe ¼ tip”, or “Use maximum english, 3 tips”. I’ve even heard of people saying they use 4 tips of english (which is impossible no matter which definition you go by). I’ll try to clear some of this up. 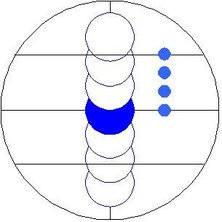 Take a look at the diagram above. I did something pretty simple – went into Word, and used the rulers (both in inches and metric) to draw a cue ball to scale, 2 1/4” in diameter. I was also able to use the drawing tool and come up with circles to represent the cue tip that were ½” in diameter (12.7mm). An average size tip, and it worked out well since Word automatically snaps the drawing objects to the nearest ¼” marking.
I started with center ball and drew three overlapping tips going up and down to represent three increments of follow and draw, overlapping in a slightly different manner so you can see the overlaps clearly. As you can see, what is commonly called a “tip” is actually a half tip – that is, you move the center of your tip up or down to the edge of the previous tip’s location. If you do this three times from the center in any direction, you reach very close to the maximum you can hit without a miscue. A few things are interesting about this. First, what I believe most people mean when they say 1 tip of english is actually a half tip. I believe that because most people I know, and most everything I’ve read, frequently talks about using 1, 2, or 3 tips of english, or somewhere in between. You can see from the diagram that it’s impossible to use 3 full tips of english, if everyone went by the physical definition we would be talking about using ½, 1, or 1 ½ tips, not 1, 2, or 3. Another possible explanation is that they are referring to the contact patch between the tip and the cue ball. Regardless of tip location, the contact patch is roughly 3mm in diameter. If you look to the right of the center axis in the diagram, I’ve drawn these contact patch positions, and you can see that as you move up, and different parts of the tip are hitting different parts of the curvature of the cue ball, you get a nice progression of 1, 2, and 3 tip positions above or below center. They are not right next to each other, and in theory you could hit spots in between these, just like you can with the regular tip positions, but they give us good reference points to work from. Speaking of which, when hitting maximum draw or follow (or side for that matter), you can see that the cue tip is 3 half tips above center, but it is actually making contact with the cue ball roughly half way between the center and edge of the cue ball. This is about the limit before the curvature of the cue ball prevents a solid hit, or in the case of draw before the table gets in the way. Since most striped balls are exactly that size, you can practice hitting with maximum spin by orientating the stripe either horizontally for draw/follow or vertically for side spin, and then aiming the inner edge of your tip at the outer edge of the stripe. If applying fresh chalk you often can also see the mark you left after the hit as well, as long as it’s not rubbed off by the table. You must learn to hit near these maximum limits to get that smooth “whipping” action on your cue ball with a minimum of force, or if you ever want to enter a trick shot competition… J And finally, to dispel one last myth – while your tip shape (dime vs. nickel) might allow you to press the limits a bit more, or at least more than a poorly shaped tip, the size of the shaft doesn’t matter that much within normal limits. I’ve heard people say they get more english with a Predator Z2 shaft, or a similar thinner shaft. The difference between that 11.75mm shaft and my example shaft of 12.7mm is 1 mm. Which means that for each half tip progression, the tip location is .5mm lower. After 3 half tips, I would be 1.5mm further from the edge than with my sample drawing. So yes I could move slightly more toward the edge with a thinner shaft in terms of “tips”, but the actual physical location of the edge of the tip in the maximum tip position for either shaft is achievable just the same. The difference with the smaller shafts is that visually they appear to be slightly less toward the outside of the ball, or more above the table on draw shots, which may give some people the confidence to venture more toward the edge of the ball. So be aware of the possible confusion around this, and when someone tells you to use a tip of english make sure you know which tip size they mean!
|
|||||||
