There are a lot of great things on Bob Jewett’s site (www.sfbilliards.com) – reprints of his articles from Billiards Digest, technical articles on all sorts of pool-related topics, etc. But in my opinion, one of the best things is the article focusing on Progressive Practice Drills.
The concept is simple – you set up a shot and execute it. Every time you are successful you increase the difficulty, if you miss you make it easier. You do this exercise with 10 or 15 balls and you will finish very close to the 50% point of making or missing the shot. You can keep a log with your scores and track your progress over time. His excellent article demonstrates exercises for working on stop shots, follow, draw, and even certain cut shots, each progressively more difficult.
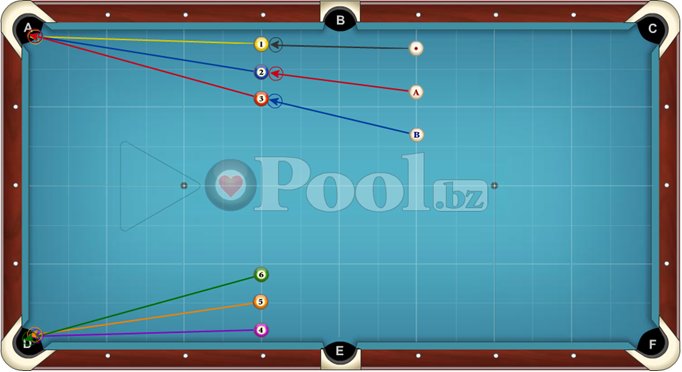
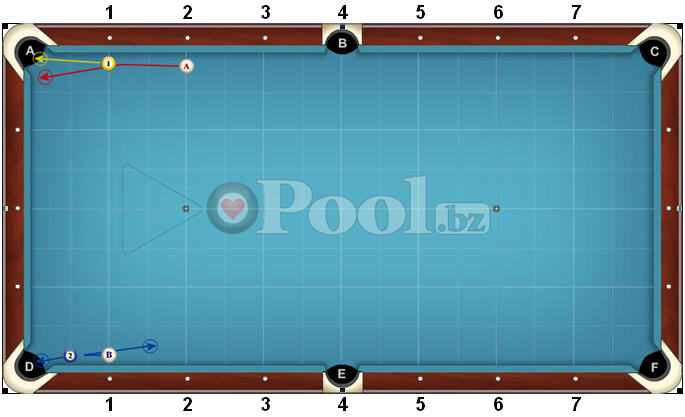
At the top of the diagram above is the setup for the follow exercise, level 1. Set up the 1 ball a little off the rail near the first diamond and the cue ball 1 diamond away. Shoot a follow shot and try to follow the cue ball to within 1 diamond of the end rail. Very simple from this initial position, but it gets harder… When you make this first shot, move both balls back a diamond, so now the object ball is at diamond 2 and the cue ball is still 1 diamond away. As mentioned, every time you make it move back a diamond, every time you miss move back to your previous position. Even if you get to position 7, keep shooting out all 15 balls, we are after consistency not best attempt.
The bottom of the diagram shows the initial position for both the stop and draw shots in the easiest configuration. For the stop shot, simply make the ball and leave the cue ball in the 1 x 1 diamond square near the corner pocket. For the draw shot, you must make the ball and draw back at least 1 diamond from the object ball. For each successful attempt, leave the object ball where it’s at and move the cue ball back 1 diamond, thus making the distance between the balls increase with each attempt.
This is only level 1 for the stop, follow, and draw drills. Levels 2 – 5 increase in difficulty by requiring you to be more and more precise with your shots in order for them to count as a successful attempt. For instance, in the level 3 draw drill, you have to draw back to at least the starting position of the cue ball but not more than 2 diamonds past. That means that for the number 7 draw shot, you have to make a ball that’s 7 diamonds away and draw it back 7 diamonds but not more than 9 – very tough indeed!
Check out the original article at http://sfbilliards.com/Misc/progpract.pdf and do the exercises and track your progress, you might be surprised on the difficulty of some of these drills and your game will definitely benefit from the challenge!
The concept is simple – you set up a shot and execute it. Every time you are successful you increase the difficulty, if you miss you make it easier. You do this exercise with 10 or 15 balls and you will finish very close to the 50% point of making or missing the shot. You can keep a log with your scores and track your progress over time. His excellent article demonstrates exercises for working on stop shots, follow, draw, and even certain cut shots, each progressively more difficult.
At the top of the diagram above is the setup for the follow exercise, level 1. Set up the 1 ball a little off the rail near the first diamond and the cue ball 1 diamond away. Shoot a follow shot and try to follow the cue ball to within 1 diamond of the end rail. Very simple from this initial position, but it gets harder… When you make this first shot, move both balls back a diamond, so now the object ball is at diamond 2 and the cue ball is still 1 diamond away. As mentioned, every time you make it move back a diamond, every time you miss move back to your previous position. Even if you get to position 7, keep shooting out all 15 balls, we are after consistency not best attempt.
The bottom of the diagram shows the initial position for both the stop and draw shots in the easiest configuration. For the stop shot, simply make the ball and leave the cue ball in the 1 x 1 diamond square near the corner pocket. For the draw shot, you must make the ball and draw back at least 1 diamond from the object ball. For each successful attempt, leave the object ball where it’s at and move the cue ball back 1 diamond, thus making the distance between the balls increase with each attempt.
This is only level 1 for the stop, follow, and draw drills. Levels 2 – 5 increase in difficulty by requiring you to be more and more precise with your shots in order for them to count as a successful attempt. For instance, in the level 3 draw drill, you have to draw back to at least the starting position of the cue ball but not more than 2 diamonds past. That means that for the number 7 draw shot, you have to make a ball that’s 7 diamonds away and draw it back 7 diamonds but not more than 9 – very tough indeed!
Check out the original article at http://sfbilliards.com/Misc/progpract.pdf and do the exercises and track your progress, you might be surprised on the difficulty of some of these drills and your game will definitely benefit from the challenge!