Scott's Pool School
Contact Me
  • Welcome!
  • Lessons and Articles
  • Master Class
  • Aiming Systems
    • SEE System and Pro One
  • Pics
  • Videos
  • Links
  • About Me

Perfect Position Drill

6/8/2013

4 Comments

 
This is a fantastic drill for practicing and tightening up your position routes.  It teaches you to work in groups of three and how to stay focused on those last few balls on the table.  It was first shown to me by Jerry Briesath, a master instructor, and is simple in concept yet very, very effective as a practice drill.  So simple in fact that no pictures are needed... :)

Throw 3 balls out on the table in a random fashion.  If you are a higher level intermediate or advanced player you can skip past 3 and start with 4 balls.  In the event the balls stick together and form a cluster, just separate them a little, this isn't about working on tough run outs.  Take ball in hand, and try to run the balls in order.  Do it 20 times, and score 1 point for every time you run out successfully, if you miss you get no score and throw the balls out again.

Simple right?  However, there's a twist - the "perfect" part in the name.  While playing position, you must leave yourself a reasonable shot on the next ball and be more or less where you intended to be.  No banks, no table length 90 degree cuts, no lucky shape (you were playing for the side but overran the position and went 2 extra rails and got shape for the corner), etc.  Now this will vary based on your skill level - an advanced player can accept a slightly longer shot or a more severe cut angle than a beginner - essentially their effective position zone is a little larger.  Just be honest and use your best judgement - you know where you were trying to get to, if you would be happy with that position and be more than 80% to make the shot in a real game then you're fine.

Score yourself out of 20 attempts, and when you can score 15 or 16 out of 20 then add another ball.  Even intermediate players have a hard time with 3 balls if they aren't consistent shot makers or don't have a good handle on common position concepts and routes.  Getting to 5 or 6 balls takes some skill and practice.  When I do this drill, I use 6 balls and usually get 13 to 15 out of 20, still not consistently good enough to move to 7.  Yet I can crush the 7 ball ghost, since the "perfect" part does not apply and I can come with a shot and continue my run.  I grade myself harshly when doing the drill, really the only way to use it to tighten up your game.  Jerry said that even pros would have a hard time getting past 7 balls with these rules in place - I've never seen one try this drill but it makes sense - watch a typical match and you'll see where certain mistakes would cost a pro that attempt, even though in the real game they successfully made a lower percentage shot or played a great safe to win the game.

In order for this to be a teaching exercise, when you miss the shot put the ball back where it was and try again.  If you missed position, put the ball you made back and the cue ball back as best as you can and try the route again, tweaking speed/english as necessary.  If you ended up in a bad spot and find it tough to get position, then put the previous ball back up on the table and figure out if maybe you should have had a better angle, been on a different side, or taken a different route to the spot where you messed up.  If you are having a hard time figuring out what routes to take or what you are doing wrong, then consult with a better player in the room or an instructor to work on your position play decision making and routes.  

This teaching component, as well as the pressure component of scoring yourself out of 20 attempts, make this drill a great exercise.  It also very close mimics end game situations in 9 ball, so once you are able to reliably get through 4 or 5 ball patterns, when someone scratches and you get ball in hand on the 6 ball you will have a lot of confidence to finish out that rack and win the game.

Good luck!
4 Comments

Progressive Practice

4/29/2013

3 Comments

 
Picture
There are a lot of great things on Bob Jewett’s site (www.sfbilliards.com) – reprints of his articles from Billiards Digest, technical articles on all sorts of pool-related topics, etc.  But in my opinion, one of the best things is the article focusing on Progressive Practice Drills.

The concept is simple – you set up a shot and execute it.  Every time you are successful you increase the difficulty, if you miss you make it easier.  You do this exercise with 10 or 15 balls and you will finish very close to the 50% point of making or missing the shot.  You can keep a log with your scores and track your progress over time.  His excellent article demonstrates exercises for working on stop shots, follow, draw, and even certain cut shots, each progressively more difficult.

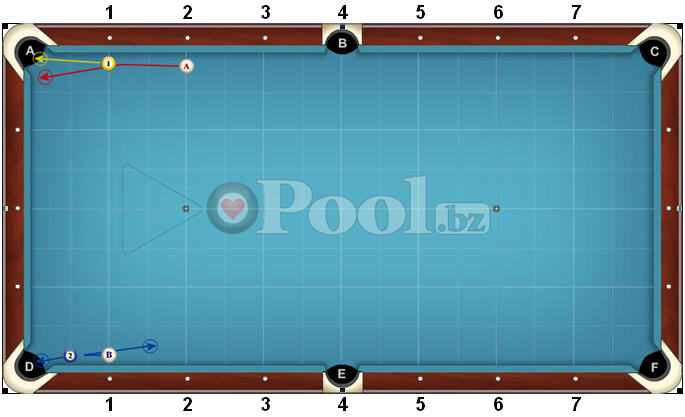
At the top of the diagram above is the setup for the follow exercise, level 1.  Set up the 1 ball a little off the rail near the first diamond and the cue ball 1 diamond away.  Shoot a follow shot and try to follow the cue ball to within 1 diamond of the end rail.  Very simple from this initial position, but it gets harder…  When you make this first shot, move both balls back a diamond, so now the object ball is at diamond 2 and the cue ball is still 1 diamond away.  As mentioned, every time you make it move back a diamond, every time you miss move back to your previous position.  Even if you get to position 7, keep shooting out all 15 balls, we are after consistency not best attempt.

The bottom of the diagram shows the initial position for both the stop and draw shots in the easiest configuration.  For the stop shot, simply make the ball and leave the cue ball in the 1 x 1 diamond square near the corner pocket.  For the draw shot, you must make the ball and draw back at least 1 diamond from the object ball.  For each successful attempt, leave the object ball where it’s at and move the cue ball back 1 diamond, thus making the distance between the balls increase with each attempt.

This is only level 1 for the stop, follow, and draw drills.  Levels 2 – 5 increase in difficulty by requiring you to be more and more precise with your shots in order for them to count as a successful attempt.  For instance, in the level 3 draw drill, you have to draw back to at least the starting position of the cue ball but not more than 2 diamonds past.  That means that for the number 7 draw shot, you have to make a ball that’s 7 diamonds away and draw it back 7 diamonds but not more than 9 – very tough indeed!

Check out the original article at http://sfbilliards.com/Misc/progpract.pdf and do the exercises and track your progress, you might be surprised on the difficulty of some of these drills and your game will definitely benefit from the challenge!

3 Comments

PAT - Follow and Draw Drill

4/28/2013

0 Comments

 
Picture
This drill is from the PAT, which is a Playing Ability Test designed by Ralph Eckert, Jorgen Sandman, and Andreas Huber.  Ralph is a professional pool player and trick shot champion as well as a top coach, I’m not sure of the other two gentlemen’s playing credentials but they are both well renowned national level coaches in Europe.

The PAT has three levels and is a point-based test.  You typically perform each exercise multiple times, scoring points for each successful attempt based on the parameters of the exercise.  There are exercises for cue ball control, shot making, and position play.  As you move from level to level some of the exercises change, but more typically the exercises are similar but with increasing difficultly, either by adding distance, more balls, or more difficult goals to the exercise.

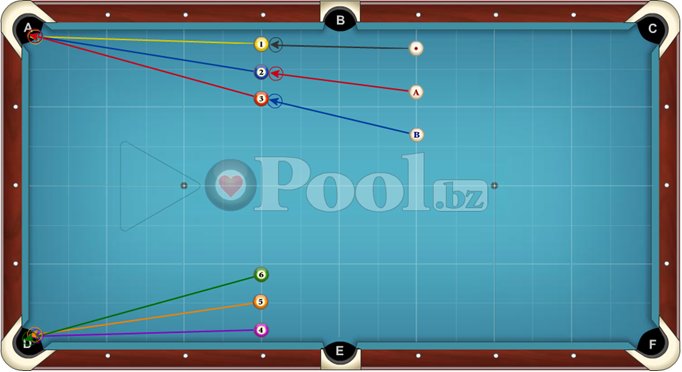
The drill diagrammed above is the Follow and Draw drill and is excellent for working on both of those skills.  Line up 6 balls as diagrammed along the third diamond, and starting two diamonds away place the cue ball so it’s straight in with the first object ball.  For Level 1, the object is to make the 1 ball and leave the cue ball near the corner pocket, no more than 1 diamond in either direction.  Do the same thing with the 2 – 6 balls.  For Level 2, you must make each ball AND follow it into the pocket, which requires both careful alignment of the balls as well as a smooth and straight stroke.

For the draw portion of the exercise, use the same setup as above.  For Level 1, make the ball and draw it back to within 2 diamonds of the top rail.  For Level 2, the object balls are placed 1 diamond further away, or even 2 diamonds further away, and you must draw back to the end rail within 1 ½ diamonds.  You can see how this can become more and more difficult very quickly.

This is a great practice drill for follow and draw.  If too difficult as diagrammed, move the balls closer together and/or closer to the pocket.  Focus on a smooth stroke, shooting only as hard as needed to accomplish the goal.  It’s not a power follow or power draw drill, the emphasis should be on clean pocketing of the object balls and smooth but strong action on the cue ball.  I would recommend doing at least 3 if not 5 repetitions of both follow and draw regularly until you can execute the shots confidently.

If you are more interested in the PAT, you can check out their website at http://www.pat-billiard.com/ and also check out YouTube for some sample exercises, including this one, being demonstrated by none other than Thorsten Hohmann.

0 Comments

Vertical Line Drill

3/11/2013

0 Comments

 
Picture
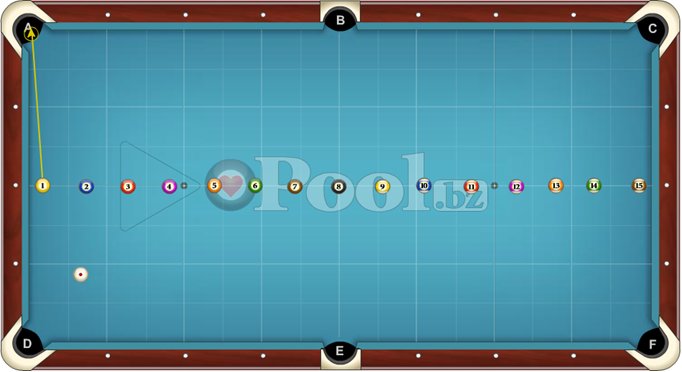
This is a nice complement to the across the table version.  This one though isn’t so much about working on your stroke as it is working on position play.  

This drill is quite versatile as well, with several approaches ranging from easy to more difficult:

1)      Shoot in any order, any pocket, from either side

2)      Shoot in any order, any pocket, but staying on the same side of the line

3)      Shoot in any order but only in the two corner pockets

4)      Shoot in order, staying on the same side, either any pocket or corners only

5)      Shoot in order, alternating sides, any pocket or corners only

6)      If you are not feeling challenged, bank them all in cross corner or cross side

So try this one out as well, maybe alternating from time to time with the across the table version to keep things interesting.

0 Comments

Across the Middle Line Drill

3/6/2013

1 Comment

 
Picture
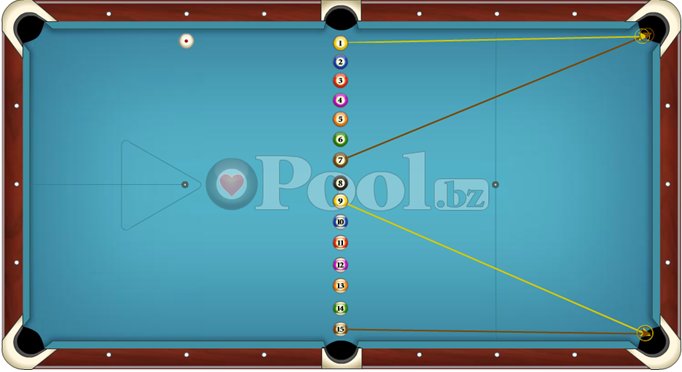
This is a fantastic drill for players of all skill levels, simplistic in its complexity (if that even makes sense).  While it can be both boring and frustrating at the same time, there are so many variations that there is something for everyone.

In its basic form, you line up 15 balls across the middle of the table and place the cue ball 2 diamonds away so that the shot is straight in on the 1 ball.  If you are a beginner, feel free to place the cue ball just 1 diamond away (along the third diamond) to make it a bit easier.  Take your time and line up the shot properly, no reason to make it harder than it already is.  Go through your routine and pocket the 1 ball in the corner with a nice smooth stop shot.  Move the cue ball so that it’s straight in on the 2 ball and shoot it in the corner pocket next.  Continue up to the 8 ball, at which point you can choose to shoot it in the same corner or switch corners.  Then continue with the 9 – 15 in the opposite corner.

This is great for assessing flaws in your stroke – and also your ability to line the shots up straight…  There is enough distance between the cue ball and object ball and the object ball and pocket where slight mishits will not go in, especially on tight equipment.  You also learn to aim for the proper part of the pocket as you get closer to the rails.  You will see if you favor one side or the other, and if hitting stop shots how good your stop shot really is.  You can focus on different things as you repeat the drill – maybe your grip, eye patterns, smoothness of stroke, staying down, etc.  Like I said, a lot bundled up in this one drill.

But wait – there’s more.  This is a perfect drill to do in sets and to keep track of your scores.  Keeping score not only gives you a baseline and helps you measure improvement, but it also adds pressure while doing the drill as you try to beat previous best scores, adding an element of real competitive pressure to your practice. 

The easiest way to score is what you would expect - just keep track of how many balls you make out of 15.  Whenever you miss just leave the ball on the table and put it in the middle of the opposite end rail, then it’s easy to count when you are done.  You can also shoot until you miss, then line up and start over.  If you manage to sink 15 out of 15, keep going and try to beat your high score.

If you get tired of shooting stop shots over and over, add some variety.  Do a few rows where you try and follow the ball in the pocket, or draw back to the end rail.  Work on smoothness and accuracy, shooting only as hard as necessary to get the cue ball to its target and having it roll end over end with no side spin.  You can also work on replacement shots, or short draws, to really fine tune your tip position and speed control.  If you are an advanced player, move the cue ball back to the first diamond, or even frozen to the end rail.  The possibilities are endless.

Ralf Eckert mentioned shooting 5000 shots using this drill!  It is a great way to refine and perfect your stroke.  If you committed to just 10 rows of 15 balls each week, it would take 33 weeks to complete, but at the end of that time imagine how much improvement you would see with your alignment and stroke, and your confidence on these types of shots would soar during matches.  Something to think about for sure.
1 Comment

    Archives

    August 2018
    June 2018
    May 2018
    February 2017
    November 2016
    October 2016
    August 2015
    October 2013
    September 2013
    August 2013
    June 2013
    April 2013
    March 2013
    February 2013
    January 2013

    Categories

    All
    Drills
    General
    Instructional
    Kicking Systems

Powered by Create your own unique website with customizable templates.